Did you know that you can make a battery from just a lemon and some bits of metal? This type of battery is called an “electrolytic cell” or chemical battery. It works in the same way as your TV remote or game-controller batteries. We’ll explain more details later, but basically, the lemon juice and metal plates react with each other, creating electricity. Let’s see if we can light up an LED with a lemon and learn about batteries along the way!


Materials/Tools you’ll need

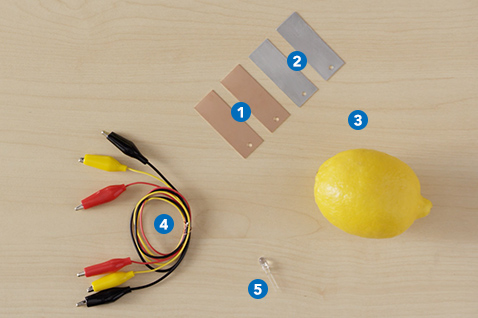
1 x copper plate per battery

1 x zinc plate per battery

1 x big lemon (or two small lemons)

3 x alligator-clip wires

1 x 5 mm LED (2.2 V)
・Kitchen knife
・Cutting board
・Tin snips
If you can’t get metal plates, don’t panic! Use large galvanized nails (they must be galvanized) or paperclips instead. Both are coated in zinc. Copper coins or speaker wire will also work. However, you will need to make more than two batteries and connect them together, so remember extra lemons and alligator wires.

Did you know that you can make a battery from just a lemon and some bits of metal? This type of battery is called an “electrolytic cell” or chemical battery. It works in the same way as your TV remote or game-controller batteries. We’ll explain more details later, but basically, the lemon juice and metal plates react with each other, creating electricity. Let’s see if we can light up an LED with a lemon and learn about batteries along the way!


Materials/Tools you’ll need
1 x copper plate per battery
1 x zinc plate per battery
1 x big lemon (or two small lemons)
3 x alligator-clip wires
1 x 5 mm LED (2.2 V)
・Kitchen knife
・Cutting board
・Tin snips
If you can’t get metal plates, don’t panic! Use large galvanized nails (they must be galvanized) or paperclips instead. Both are coated in zinc. Copper coins or speaker wire will also work. However, you will need to make more than two batteries and connect them together, so remember extra lemons and alligator wires.


We’re going to make two batteries out of one large lemon. Then, we’ll connect them with wire so we have enough energy to light up an LED. If your metal plates are too big for the lemon halves, get an adult to cut them with tin snips.
The battery won’t work very well if the plates are oily from your fingerprints. Wash the plates in a mild detergent. Hold carefully to stop them from getting dirty.
The edges are sharp! Be very careful when touching the plates to avoid injury.


Roll the lemon on a table with your palm. This releases the juice inside the lemon! Next, cut it in half. Use your knife to cut two slits in each half on the flesh side. They should be 5 mm apart and deep enough to fit most of the metal plate inside. If the plates are too far apart, the battery won’t work well.
It’s fine to use two small lemons instead of one big one. Cut 1/3 off each and use the big parts for your batteries. Fresh lemons are more juicy than old ones, and see if you can find some with thin skin. It’s easier to cut.


In each half of the lemon, push one zinc plate and one copper plate into the slits you cut. Push them in as far as you can without breaking the skin on the other side. Do it at an angle, so just the top corner is sticking out. We want to cover the metal with as much juice as we can, because it will increase the amount of electrical current our lemon can make.
These metal plates can be dangerously sharp. Please be careful. It’s a good idea to use a pair of pliers to insert them, just to be safe.


Let’s make the circuit so our lemon can do some work! First, clip a black wire onto the zinc plate on one half of the lemon, and second red wire onto the copper plate on the other lemon. Next, take a third wire and connect it to the remaining copper and zinc plates on each lemon.
You can see in the picture that we used a yellow wire to join the batteries. That’s just to make it easy to understand. You can use any color wire.


Now we’re going to close the circuit by connecting our LED to the black and red wires. The LED will have two legs (terminals): one long and one short. The long leg is positive (+). Clip the red cable you already connected to the copper plate onto the long leg. Now clip the black wire connected to the zinc plate onto the short leg.
If you accidentally connect the LED the wrong way (reversed connection), the LED won’t light up and might even get damaged. Double-check that the longer (positive) leg is clipped onto the wire connected to the copper plate before clipping onto the other cable.


Did your LED light up? Congratulations! You’ve made a real working battery from a lemon! If it didn’t work, see the troubleshooting section below.
The chemicals in the lemon can’t generate electricity continuously. The LED will grow dim after a while. If you have more copper, replace it and start again!
DO NOT LICK, EAT, OR CONSUME THE LEMON BATTERY. As soon as the metal plates are inserted into the lemon, it is contaminated by traces of dissolved metals. Dispose of the lemon after use.

We’re going to make two batteries out of one large lemon. Then, we’ll connect them with wire so we have enough energy to light up an LED. If your metal plates are too big for the lemon halves, get an adult to cut them with tin snips.
The battery won’t work very well if the plates are oily from your fingerprints. Wash the plates in a mild detergent. Hold carefully to stop them from getting dirty.
The edges are sharp! Be very careful when touching the plates to avoid injury.

Roll the lemon on a table with your palm. This releases the juice inside the lemon! Next, cut it in half. Use your knife to cut two slits in each half on the flesh side. They should be 5 mm apart and deep enough to fit most of the metal plate inside. If the plates are too far apart, the battery won’t work well.
It’s fine to use two small lemons instead of one big one. Cut 1/3 off each and use the big parts for your batteries. Fresh lemons are more juicy than old ones, and see if you can find some with thin skin. It’s easier to cut.

In each half of the lemon, push one zinc plate and one copper plate into the slits you cut. Push them in as far as you can without breaking the skin on the other side. Do it at an angle, so just the top corner is sticking out. We want to cover the metal with as much juice as we can, because it will increase the amount of electrical current our lemon can make.
These metal plates can be dangerously sharp. Please be careful. It’s a good idea to use a pair of pliers to insert them, just to be safe.

Let’s make the circuit so our lemon can do some work! First, clip a black wire onto the zinc plate on one half of the lemon, and second red wire onto the copper plate on the other lemon. Next, take a third wire and connect it to the remaining copper and zinc plates on each lemon.
You can see in the picture that we used a yellow wire to join the batteries. That’s just to make it easy to understand. You can use any color wire.

Now we’re going to close the circuit by connecting our LED to the black and red wires. The LED will have two legs (terminals): one long and one short. The long leg is positive (+). Clip the red cable you already connected to the copper plate onto the long leg. Now clip the black wire connected to the zinc plate onto the short leg.
If you accidentally connect the LED the wrong way (reversed connection), the LED won’t light up and might even get damaged. Double-check that the longer (positive) leg is clipped onto the wire connected to the copper plate before clipping onto the other cable.

Did your LED light up? Congratulations! You’ve made a real working battery from a lemon! If it didn’t work, see the troubleshooting section below.
The chemicals in the lemon can’t generate electricity continuously. The LED will grow dim after a while. If you have more copper, replace it and start again!
DO NOT LICK, EAT, OR CONSUME THE LEMON BATTERY. As soon as the metal plates are inserted into the lemon, it is contaminated by traces of dissolved metals. Dispose of the lemon after use.

If your LED did not light up…
- Check that the metal plates and LED are wired together correctly. Starting from the LED and moving around the circuit:
- LED’s long leg → Copper plate [Lemon 1]
- Zinc plate [Lemon 1] → Copper plate [Lemon 2]
- Zinc plate [Lemon 2] → LED’s shorter leg
- Check the position of the plates in the lemon. Are they deep enough and adequately covered? Are they too far apart? Is the LED connection reversed?
- Check the LED. Is it a 2.2-volt type? You can check that it’s working properly by using two regular 1.5 V AA-size (LR6) alkaline batteries connected in the same way as the lemon battery.

![]()
Just like one from the store! Batteries use copper and zinc (called the electrodes) with a liquid or paste called electrolyte inside a metal cylinder. The copper forms the positive (+) battery terminal, and the zinc is the negative (-) terminal. The electrolyte in our lemon battery is lemon juice. Just like regular batteries, it contains acid. Acid attacks the zinc atoms, and some change into positively charged ions (charged atoms that have an unequal number of electrons or protons). An electric current is created between the two metals. When the zinc atoms change into ions, they leave their electrons behind. Connect a wire to the battery terminals and they flow out of the zinc electrode and into the copper electrode. The cycle continues until the electrolyte uses all its chemical energy and can’t react with the metal anymore, and the battery dies. Electrolyte is why this type of battery is called a chemical battery.

![]()
- Batteries use two different kinds of metal and electrolyte to work
- Electrons released by chemically changed metals create current
- A wire connects the two metals to form a circuit
- An LED can be put into the circuit, and the electric current powers it
Besides lemons, you can use other fruits (such as grapefruit or kiwi fruit), juicy vegetables, and even potatoes to make a battery. All of them contain the electrolytes needed to make electricity. Why don’t you experiment with leftover stuff in the fridge?

Battery mechanisms
While fruit batteries can make electricity, they aren’t so practical. Factory-made batteries use electrolyte solution that’s mixed with different materials to solidify the insides of the battery and make it portable. These are called dry batteries. The most basic dry battery of all is the manganese battery. The whole container (called a can) is made of zinc, and serves as the negative electrode. A solution called manganese dioxide is mixed into the electrolyte to make it solid. The positive terminal is a metal cap connected to a carbon rod that sticks down into the electrolyte. It all combines to make the battery safer and more efficient. Alkaline manganese dry batteries have a different design, but produce electricity in the same way as our simple lemon battery.

* Carbon is not metal, but it’s much better at collecting electricity because it is highly conductive (it lets electrons pass through smoothly) and is also more resistant to chemical change.
![]()
Just like one from the store! Batteries use copper and zinc (called the electrodes) with a liquid or paste called electrolyte inside a metal cylinder. The copper forms the positive (+) battery terminal, and the zinc is the negative (-) terminal. The electrolyte in our lemon battery is lemon juice. Just like regular batteries, it contains acid. Acid attacks the zinc atoms, and some change into positively charged ions (charged atoms that have an unequal number of electrons or protons). An electric current is created between the two metals. When the zinc atoms change into ions, they leave their electrons behind. Connect a wire to the battery terminals and they flow out of the zinc electrode and into the copper electrode. The cycle continues until the electrolyte uses all its chemical energy and can’t react with the metal anymore, and the battery dies. Electrolyte is why this type of battery is called a chemical battery.
![]()
- Batteries use two different kinds of metal and electrolyte to work
- Electrons released by chemically changed metals create current
- A wire connects the two metals to form a circuit
- An LED can be put into the circuit, and the electric current powers it
Besides lemons, you can use other fruits (such as grapefruit or kiwi fruit), juicy vegetables, and even potatoes to make a battery. All of them contain the electrolytes needed to make electricity. Why don’t you experiment with leftover stuff in the fridge?

Battery mechanisms
While fruit batteries can make electricity, they aren’t so practical. Factory-made batteries use electrolyte solution that’s mixed with different materials to solidify the insides of the battery and make it portable. These are called dry batteries. The most basic dry battery of all is the manganese battery. The whole container (called a can) is made of zinc, and serves as the negative electrode. A solution called manganese dioxide is mixed into the electrolyte to make it solid. The positive terminal is a metal cap connected to a carbon rod that sticks down into the electrolyte. It all combines to make the battery safer and more efficient. Alkaline manganese dry batteries have a different design, but produce electricity in the same way as our simple lemon battery.
* Carbon is not metal, but it’s much better at collecting electricity because it is highly conductive (it lets electrons pass through smoothly) and is also more resistant to chemical change.

- The potential voltage produced by lemon batteries varies depending on the combination of metals used: copper and zinc produce up to 1.1 V, for example. However, the voltage will decrease to around 0.8 V after a short time due to hydrogen generated by the chemical reaction.
- Electric current will increase in proportion to the amount of metal surface-area exposed to the electrolytic lemon juice.
A certain amount of immersed surface area is required to generate the necessary voltage to illuminate an LED.
- If the space between the metal plates is too wide, generating an electric current will be difficult due increased resistance.