
Have you ever heard of storage batteries? There’s a type of battery that can store electricity by recharging from another power supply. The mechanism we’ll learn about in this experiment is a bit different from commercial rechargeable batteries, but we can still learn how electricity can be stored, discharged, and recharged using familiar household materials and some regular dry batteries.


Materials you’ll need

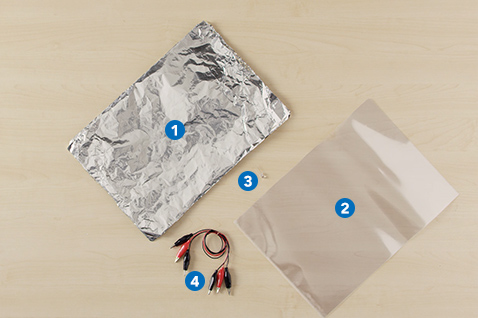
Aluminum foil: 24 cm x 28 cm x 10 pieces, 19 cm x 33 cm x 9 pieces

10 x thin plastic A4 file folders

1 x LED (an energy-saving low-power LED is used here)

3 x alligator-clip wires
・4 x D- or C-size dry batteries
・1 x 4-cell battery box

Have you ever heard of storage batteries? There’s a type of battery that can store electricity by recharging from another power supply. The mechanism we’ll learn about in this experiment is a bit different from commercial rechargeable batteries, but we can still learn how electricity can be stored, discharged, and recharged using familiar household materials and some regular dry batteries.


Materials you’ll need
Aluminum foil: 24 cm x 28 cm x 10 pieces, 19 cm x 33 cm x 9 pieces
10 x thin plastic A4 file folders
1 x LED (an energy-saving low-power LED is used here)
3 x alligator-clip wires
・4 x D- or C-size dry batteries
・1 x 4-cell battery box

Cut the aluminum foil into two sizes, which we’ll call “A” and “B”, as below:
A: 24 cm x 28 cm size x 10 pieces
B: 19 cm x 33 cm size x 9 pieces
These are approximate sizes when using an A4 plastic file folder.
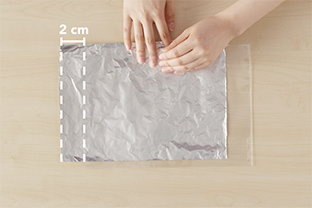

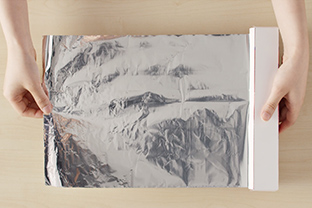
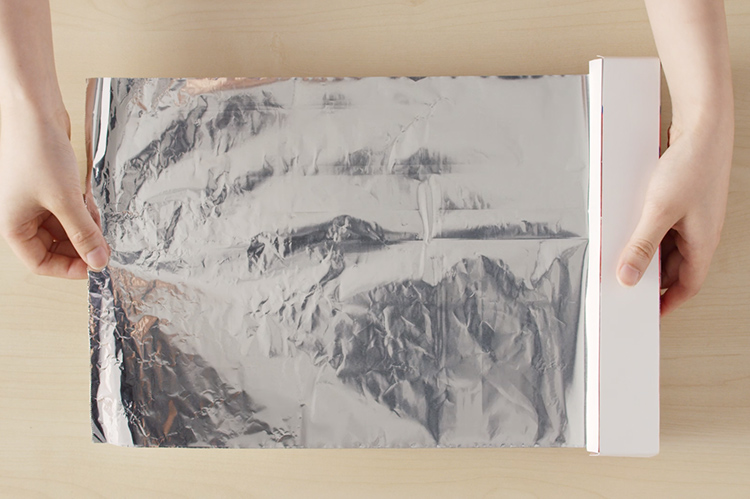
With the longer, open side of the folder facing towards you, insert a sheet of A-size foil in the same orientation as the folder (long side facing you). Position it so there’s about 2 cm of foil hanging out of the open top end of the file. Keep the foil’s long edge parallel to the long edge of the folder.
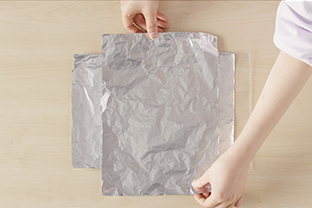

Next, take a sheet of B-size foil and lay it over the top of your folder cross-wise, with the short edge facing you. The B-size foil is longer than the A-size sheet inside your folder. Position it in the center, so there’s an equal amount of foil hanging over the long edges of the folder. Take another folder, slip in a sheet of A-size foil exactly the same as you did before, and stack it over the first folder, with the B-size sheet sandwiched in between. Keep this up, alternating layers of A-size and B-size sheets until all your folders and foil sheets are used up. You should have an A-size folder on the bottom and top of your pile. Be sure to align all your foil sheets neatly.
The A-size foil must never touch the B-size foil. If they do, heat will be generated. In some cases, it can be dangerous enough to cause a burn.
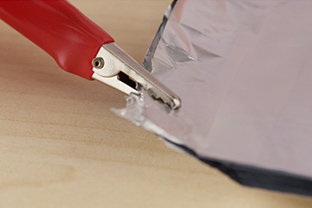

Take a red (+) alligator-clip wire and clamp it onto an exposed corner of your A-size foil bundle. Do the same thing with the B-size sheets using your other black (-) alligator wire.
Use a clothes-peg to secure your sheets in a neat bundle as you work.
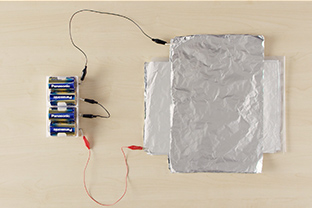

Attach the other end of the black (-) alligator clip onto the outer negative terminal of your battery box, and the opposite end of your red (+) alligator-clip wire to the outer positive terminal at the other end of your battery box. Some battery boxes have four terminals and four batteries, so you’ll need to connect the batteries in series. Clip a third alligator lead onto the inner positive and negative terminals to do this. Next, we’re going to charge the foil. Leave the wires attached to the battery box for about 30–60 seconds.
If you detect a burning smell after connection, most likely the aluminum foil plates are in contact. Disconnect the battery box immediately and stop the experiment.
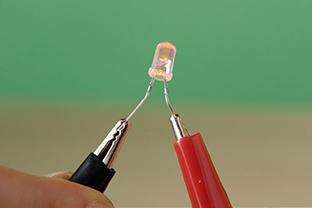

After a minute of charging the foil, disconnect the alligator-clip wire from the battery box and clip an LED between the wires where the battery box was. It should light up for a moment, proving that carefully arranged foil can be charged and discharged, just like a store-bought rechargeable battery.
An LED has positive and negative polarities. Be sure to connect the long (positive) leg to the battery’s positive terminal, and the short (negative) leg to the negative battery terminal to correctly make a circuit.
Cut the aluminum foil into two sizes, which we’ll call “A” and “B”, as below:
A: 24 cm x 28 cm size x 10 pieces
B: 19 cm x 33 cm size x 9 pieces
These are approximate sizes when using an A4 plastic file folder.
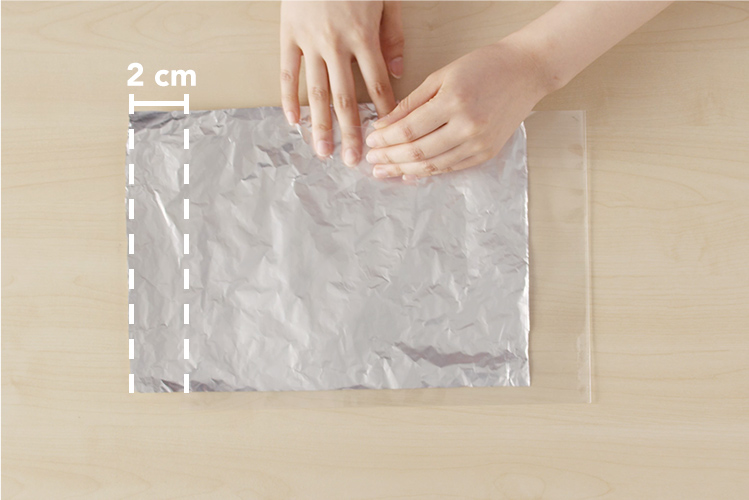
With the longer, open side of the folder facing towards you, insert a sheet of A-size foil in the same orientation as the folder (long side facing you). Position it so there’s about 2 cm of foil hanging out of the open top end of the file. Keep the foil’s long edge parallel to the long edge of the folder.
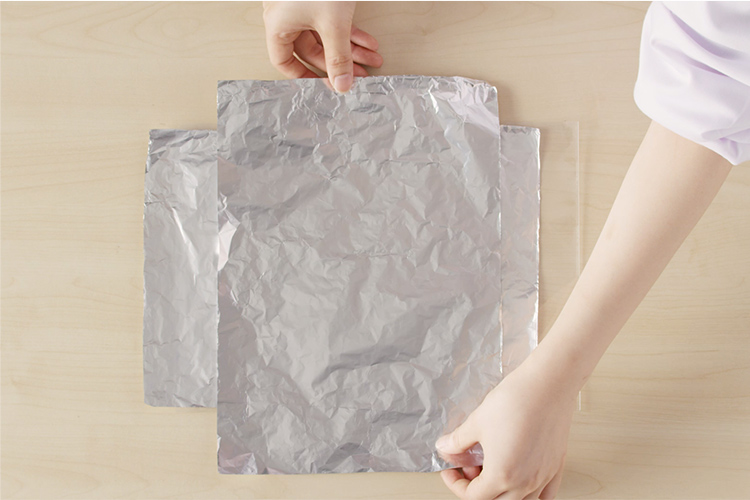
Next, take a sheet of B-size foil and lay it over the top of your folder cross-wise, with the short edge facing you. The B-size foil is longer than the A-size sheet inside your folder. Position it in the center, so there’s an equal amount of foil hanging over the long edges of the folder. Take another folder, slip in a sheet of A-size foil exactly the same as you did before, and stack it over the first folder, with the B-size sheet sandwiched in between. Keep this up, alternating layers of A-size and B-size sheets until all your folders and foil sheets are used up. You should have an A-size folder on the bottom and top of your pile. Be sure to align all your foil sheets neatly.
The A-size foil must never touch the B-size foil. If they do, heat will be generated. In some cases, it can be dangerous enough to cause a burn.
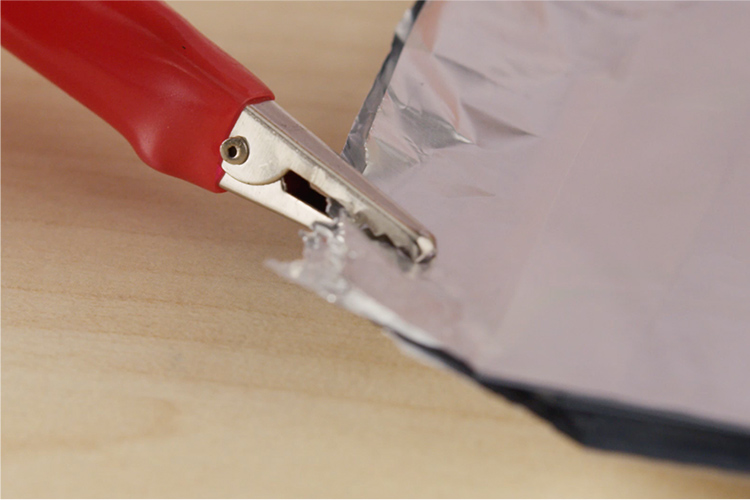
Take a red (+) alligator-clip wire and clamp it onto an exposed corner of your A-size foil bundle. Do the same thing with the B-size sheets using your other black (-) alligator wire.
Use a clothes-peg to secure your sheets in a neat bundle as you work.
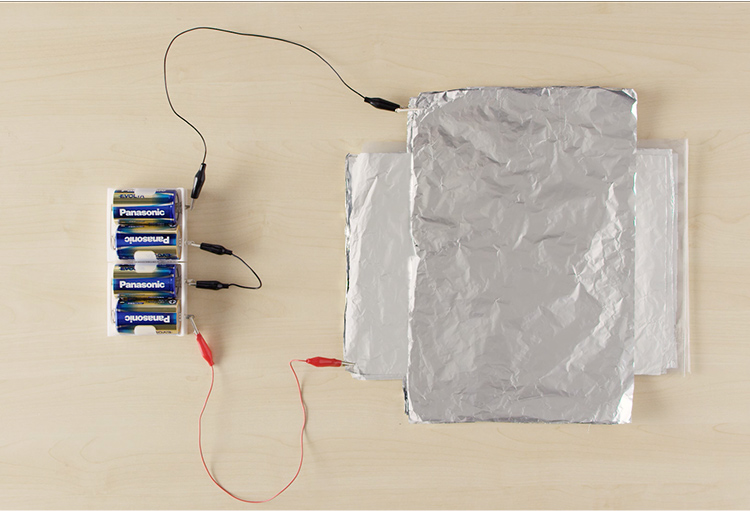
Attach the other end of the black (-) alligator clip onto the outer negative terminal of your battery box, and the opposite end of your red (+) alligator-clip wire to the outer positive terminal at the other end of your battery box. Some battery boxes have four terminals and four batteries, so you’ll need to connect the batteries in series. Clip a third alligator lead onto the inner positive and negative terminals to do this. Next, we’re going to charge the foil. Leave the wires attached to the battery box for about 30–60 seconds.
If you detect a burning smell after connection, most likely the aluminum foil plates are in contact. Disconnect the battery box immediately and stop the experiment.
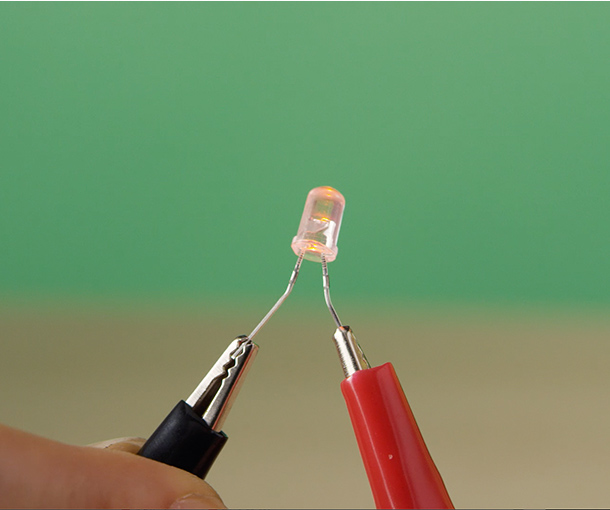
After a minute of charging the foil, disconnect the alligator-clip wire from the battery box and clip an LED between the wires where the battery box was. It should light up for a moment, proving that carefully arranged foil can be charged and discharged, just like a store-bought rechargeable battery.
An LED has positive and negative polarities. Be sure to connect the long (positive) leg to the battery’s positive terminal, and the short (negative) leg to the negative battery terminal to correctly make a circuit.

If your LED did not light up…
- Check the layers of aluminum foil. Are they properly layered and aligned? Check to see if the foil is wrinkled. Creased foil won’t work well. Keep it as flat as possible.
- Check the LED’s orientation to the alligator clips, as LEDs have positive and negative polarities. The longer leg is the positive terminal (connect to the red wire) and the shorter leg is negative (connect to the black wire).
- To reduce the amount of electricity that escapes through the desk, try placing the lid of a polystyrene box or Styrofoam plate under the foil battery.

![]()
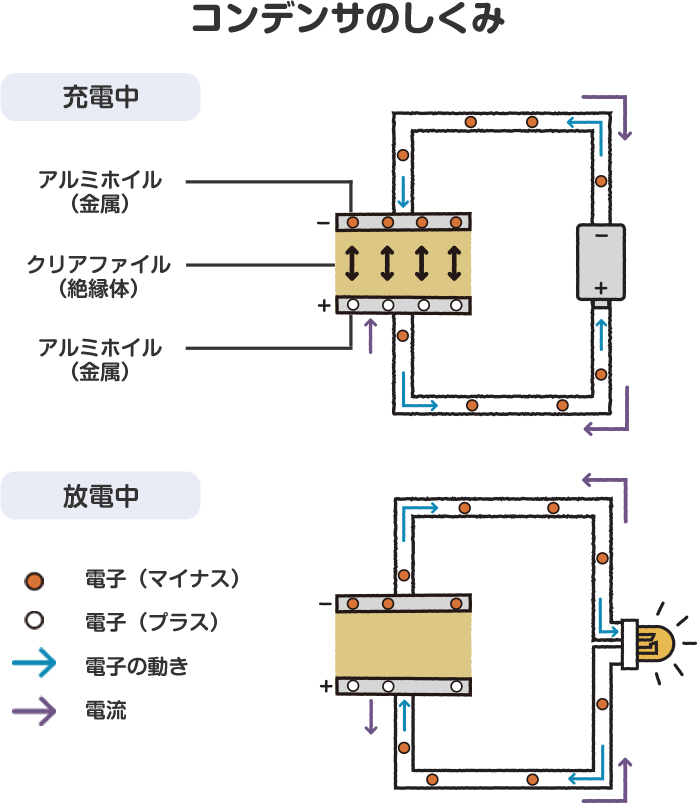
When aluminum foil and a power supply are connected, negatively charged electrons move. Because our plastic folder separators do not conduct electricity, the electrons flow out of the battery, through the black wire, and into the B-size foil sheets, which become negatively charged. The other sheets of foil are drained of electrons and gather a positive charge. When the battery is disconnected, electricity remains in the two stacks of foil sheets because the positively and negatively charged particles attract each other through the plastic barrier, but can’t go anywhere. Our sheets of foil and plastic separators have turned into a storage battery. When we connect the wires to the LED, a circuit is formed, allowing the electrons to move through the wire, light up the LED, and enter the positively charged foil sheets where the electrical charges cancel each other out. Congratulations, you just made a simple, low-capacity rechargeable battery using a mechanism called a capacitor.

![]()
A capacitor is a structure that lets conductive materials (which let electrons flow with minimal resistance, such as some kinds of metal) to be placed opposite each other between an insulator (material that is non-conductive, like our plastic files). As well as storing electricity, capacitors can be a part of other electronic assemblies, where their function is to adjust the rate of current flow. Because electricity is stored on the metal’s surface, it makes sense that the greater the surface area of conductive material we can use, the more electricity we can store. That’s why we used so many sheets of aluminum foil in our experiment.
![]()
- When metal plates face each other with an insulator in between, electricity can be stored. This is the basic structure of a capacitor.
- If more aluminum foil and plastic file folders are used, the amount of energy you can store increases proportionally. If you added more sheets, what effect do you think would it have on the LED? How about if you reduced the number of sheets? What’s the minimum amount you need to illuminate the diode? Find out!
- What happens if you use thinner material such as a plastic bag or saran food wrap instead of plastic file folders? Experiment with different plastic insulators to see what results you can observe.
Do not use objects that can conduct electricity as an insulator. Try plastic file folders of different thicknesses, plastic bags, etc. Excess current is dangerous. Use caution when performing this experiment to prevent heat generation, smoke and/or fire, and burns.

Introducing the rechargeable battery
Although they might use a different, more efficient capacitor mechanism to the basic one we made, store-bought storage batteries can be discharged and recharged over and over again. They are called secondary batteries and the types vary depending on the electrode material (the part of the battery that works like a long-lasting fuel). Nickel-metal hydride batteries use an oxidized nickel compound for the positive pole and a hydrogen compound, or a hydrogen-storing alloy, for the negative pole. They are used in devices such as cameras, portable audio players, and laptop computers. Some nickel-metal hydride batteries are the same size as regular dry batteries. These will probably be the secondary battery type you’re most familiar with.

![]()
When aluminum foil and a power supply are connected, negatively charged electrons move. Because our plastic folder separators do not conduct electricity, the electrons flow out of the battery, through the black wire, and into the B-size foil sheets, which become negatively charged. The other sheets of foil are drained of electrons and gather a positive charge. When the battery is disconnected, electricity remains in the two stacks of foil sheets because the positively and negatively charged particles attract each other through the plastic barrier, but can’t go anywhere. Our sheets of foil and plastic separators have turned into a storage battery. When we connect the wires to the LED, a circuit is formed, allowing the electrons to move through the wire, light up the LED, and enter the positively charged foil sheets where the electrical charges cancel each other out. Congratulations, you just made a simple, low-capacity rechargeable battery using a mechanism called a capacitor.
![]()
A capacitor is a structure that lets conductive materials (which let electrons flow with minimal resistance, such as some kinds of metal) to be placed opposite each other between an insulator (material that is non-conductive, like our plastic files). As well as storing electricity, capacitors can be a part of other electronic assemblies, where their function is to adjust the rate of current flow. Because electricity is stored on the metal’s surface, it makes sense that the greater the surface area of conductive material we can use, the more electricity we can store. That’s why we used so many sheets of aluminum foil in our experiment.
![]()
- When metal plates face each other with an insulator in between, electricity can be stored. This is the basic structure of a capacitor.
- If more aluminum foil and plastic file folders are used, the amount of energy you can store increases proportionally. If you added more sheets, what effect do you think would it have on the LED? How about if you reduced the number of sheets? What’s the minimum amount you need to illuminate the diode? Find out!
- What happens if you use thinner material such as a plastic bag or saran food wrap instead of plastic file folders? Experiment with different plastic insulators to see what results you can observe.
Do not use objects that can conduct electricity as an insulator. Try plastic file folders of different thicknesses, plastic bags, etc. Excess current is dangerous. Use caution when performing this experiment to prevent heat generation, smoke and/or fire, and burns.

Introducing the rechargeable battery
Although they might use a different, more efficient capacitor mechanism to the basic one we made, store-bought storage batteries can be discharged and recharged over and over again. They are called secondary batteries and the types vary depending on the electrode material (the part of the battery that works like a long-lasting fuel). Nickel-metal hydride batteries use an oxidized nickel compound for the positive pole and a hydrogen compound, or a hydrogen-storing alloy, for the negative pole. They are used in devices such as cameras, portable audio players, and laptop computers. Some nickel-metal hydride batteries are the same size as regular dry batteries. These will probably be the secondary battery type you’re most familiar with.


- Take extra care not to let the A-size foils contact the B-size foils. Also, be careful to avoid touching the wire connected to the battery box, or contacting the terminals or leads with other metals. Clip the wire onto the foil first, then connect the other end to the battery box. When the battery box is disconnected, do not allow the terminals to contact metal objects. To be safe, remove the batteries from the battery box.


- Take extra care not to let the A-size foils contact the B-size foils. Also, be careful to avoid touching the wire connected to the battery box, or contacting the terminals or leads with other metals. Clip the wire onto the foil first, then connect the other end to the battery box. When the battery box is disconnected, do not allow the terminals to contact metal objects. To be safe, remove the batteries from the battery box.